Robert and I really do have a fantastic relationship.
We base our trust off what we call “open forum policy”. We’re both too exhausted by general life to bother keeping things from each other. Besides the fact that we know each other so well we can smell a lie by a mile off, why on Earth would it be worth the energy to lie to my better half?
Indeed, I can think of no reason I would ever lie to Robert (half the time I accidentally tell him what his Christmas is months in advance). But stretch the truth? Conveniently forgetting a few major minor details? Well, we all have things we’re less proud of.
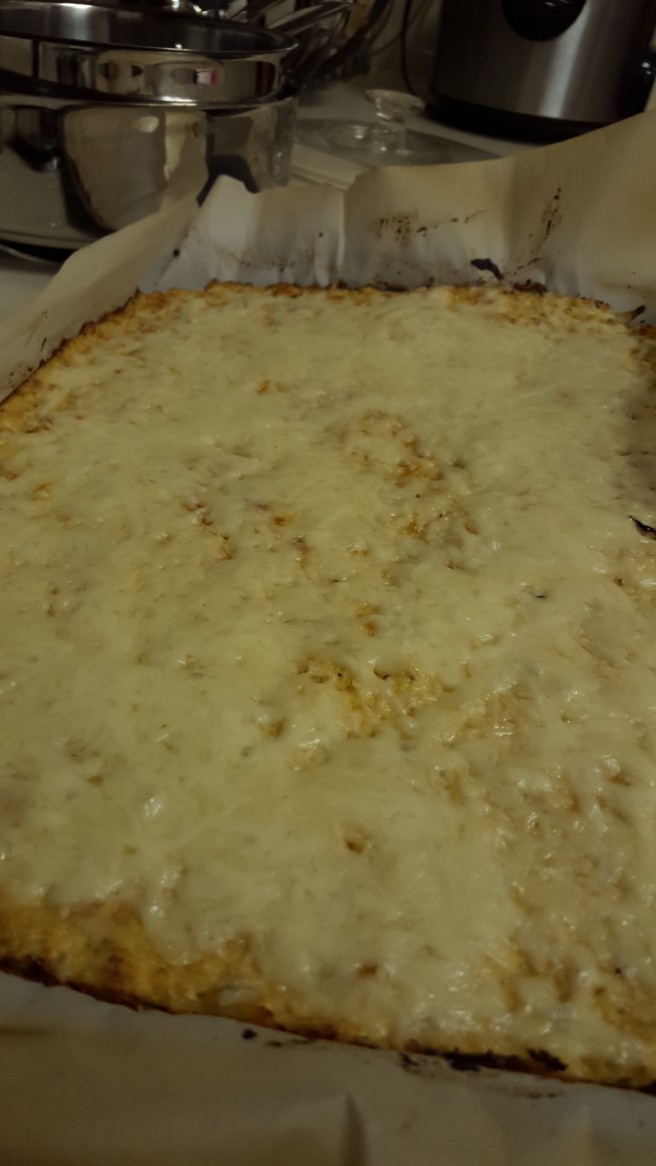
In this case the truth stretching is the main ingredient in a side dish I am lovingly calling Deception Bread. It’s cauliflower based cheesy bread substitute. Robert thought it was made out of eggs and asked such. “No… Not eggs…” Lies of omission are lies all the same, but I’ll take my chances to sneak a few more servings of vegetables into our lives.
I’m a little late to the cauliflower crust party. In fact, I have been morally opposed to it for years. I truly enjoy cauliflower,so I thought it was kind of shady to try and dress it up like something it’s not. It’s a little extra work, but certainly isn’t hard, to go from a head of cauliflower to something that can pass as cheesy bread.
A word of caution before we begin:
This tastes like cauliflower. This does not taste like cheesy bread. If you don’t want it to taste like a vegetable you probably shouldn’t make a vegetable based side dish. With that being said, there’s so much cheese in this please do not count it as a “healthy alternative”. It’s certainly more healthy, but I wouldn’t stretch so far as to call it a salad.
I served the Deception Bread with chicken parmesan. The leftovers were fab with poached eggs and pesto. Le yum.
Assemble your ingredients!
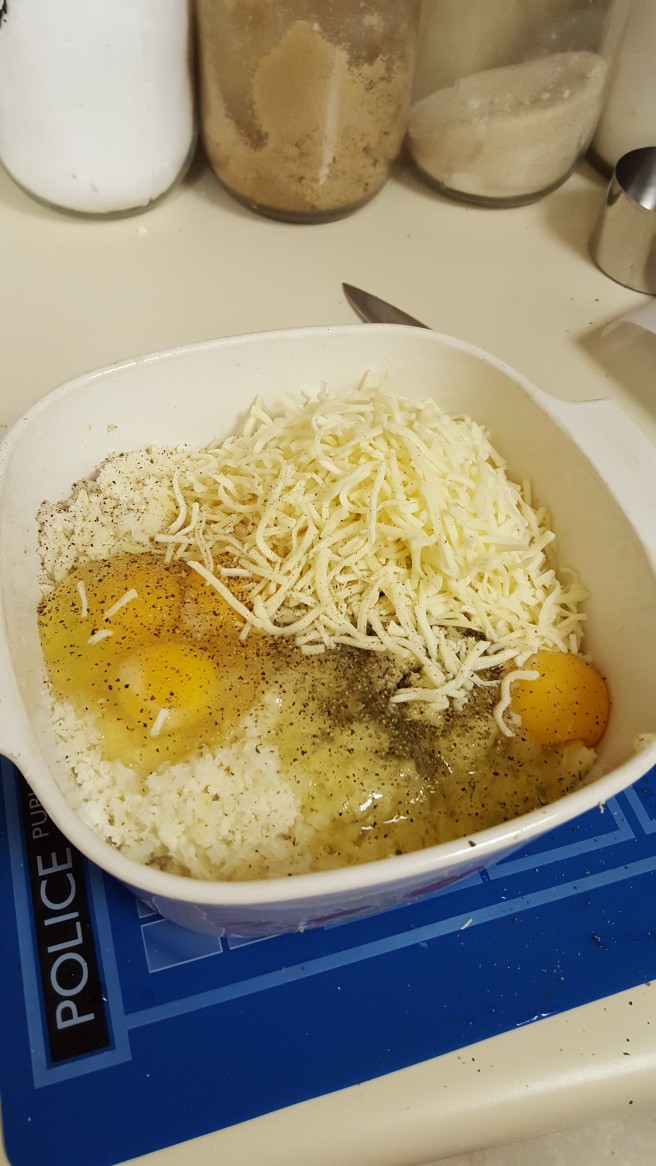
1 Cauliflower head
4 eggs
1 Cup Italian cheese
1 Cup Parmesan
1.5 Tablespoon Oregano
5 cloves garlic, minced
salt & pepper, to taste
1-2 Cups Cheese (topping cheese)
Preheat oven to 425 F, and line a large baking pan with parchment.
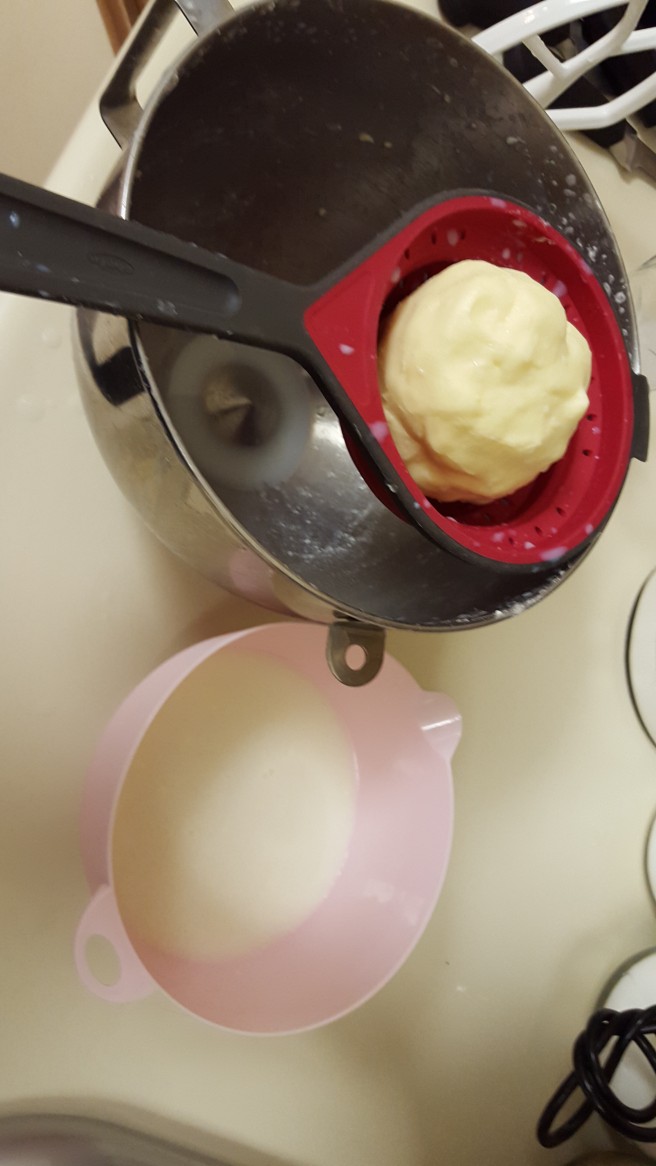
Chop chop chop your cauliflower head into small chunks. I chose to use the stems because that’s the most nutritious part. You could just use the florets, but that would make you wasteful and silly.
In about 3 small batches, blitz your cauliflower in a powerful blender or food processor until it’s the texture of course corn meal. You could also use a ricer, but I don’t know anyone who actually owns a ricer.
Put blitzed cauliflower into a microwavable dish. Cover and nuke for 10 minutes.
Once it cools to a touchable temperature, add your eggs, 2 cups cheese, garlic, and oregano.
Mix that nonsense well.
Dump it onto a jelly roll pan lined with parchment.
Smoosh it out to the sides until it’s more or less even.
Stick it in the oven for about 25 minutes, until you start to get a little browning on the top. (No, you forgot to take a picture of this step!)
Add your remaining cheese to the top of your Deception Crust, and place back in the oven for about 5 minutes, or until your cheese is to your desired meltyness.
Slice into squares, rectangles, or dodecagons.
Lie to your loved ones, and drown your guilt in this delicious cheesy bread alternative.
Shake shake shake. Shake shake shake. Shake your booty. Shake your booooty.
I think it’s a mandatory school lesson for 10-year-olds to make butter by shaking it in a mason jar. They never fully finish, because 10-year-olds aren’t exactly known for their upper body longevity and will to see projects through to the end. They continue on their merry way learning about the pilgrims and the 13 colonies. All is right in America.
We all know that before modern technology butter was made in a butter churn. We all know that if you shake cream long enough it’ll turn into butter. If you’re anything like me you’ve accidentally whipped your whipped cream too long and ended up with terrible results.
So that’s how butter is made. Yep. Woohoo. Sounds good. That’s it. Right?
Boy, have I got a surprise for you. Apparently I was one of the lazy fourth graders who didn’t shake their cream long enough to make butter, because I had no idea about buttermilk. None!
Buttermilk is actually a by-product of butter. You shake your jar, the milk solids bind together to make butter, and the liquid is buttermilk. Who even knew?
Let’s make it. Assemble your ingredients:
Quart heavy cream
Pinch of salt (optional)
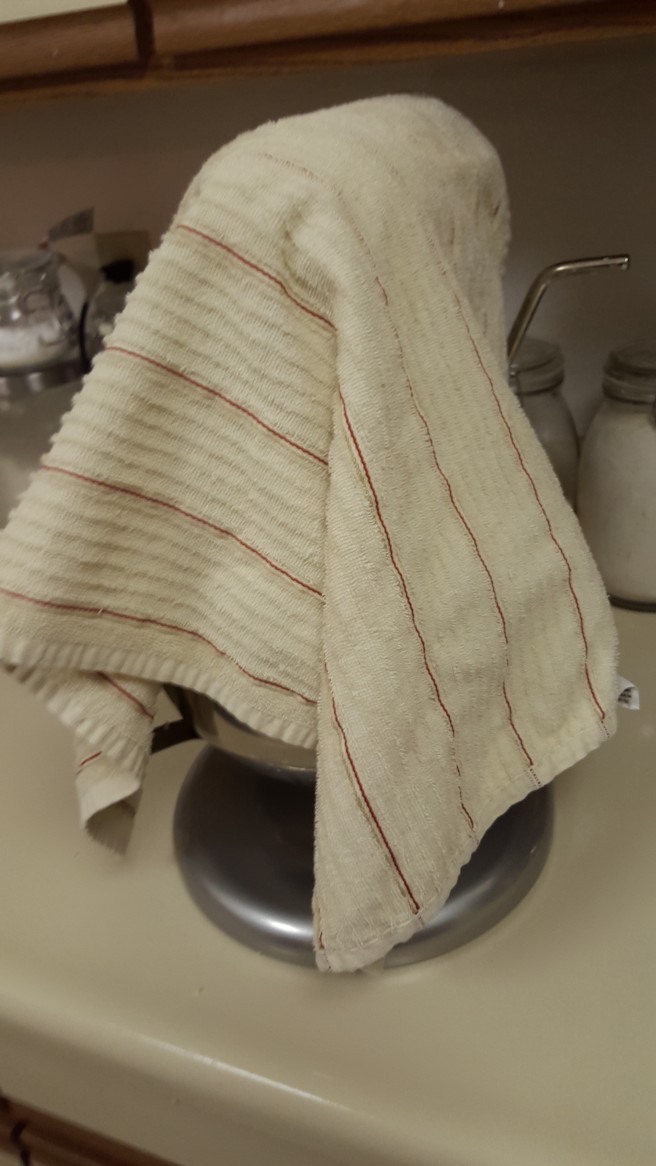
Put your heavy cream into a jar, or into the bowl of a stand mixer. I used a mixer. 10-year-old or not, I have no intention of shaking a jar to make butter. Nope.
Attach the paddle attachment for your stand mixer, and cover with a towel or saran wrap. This is important. Please cover your bowl, or you’ll have a mess on your hands.
Turn the mixer onto medium, and work your way up to a high setting slowly.
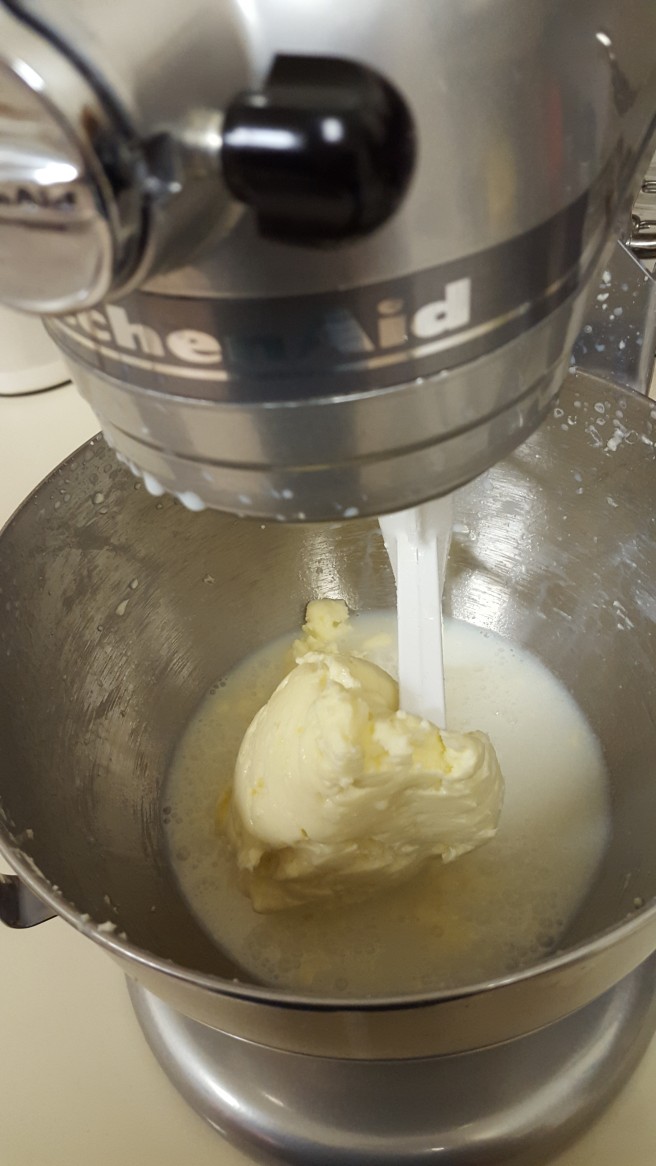
It should take about 10 minutes for the milk solids to clump together. You’ll know it’s ready because the butter will be in a huge clump on your paddle and buttermilk will be flying out of your bowl and soaking through your towel.
Strain off buttermilk. Take the time to squeeeeze the last ounce or so of buttermilk out of your butter ball. It sounds weird, and that’s because it is.
I couldn’t get this picture to rotate. Sorry, guys.
Refrigerate both the buttermilk and the butter separately, in air tight containers.
Now. Does this recipe save you money? Unless you usually have some buttermilk laying around (which I like to), probably no. Please don’t discard your buttermilk though. It’s wonderful. You could use it in bread doughs, pancakes, biscuits, or home made ranch dressing (le yum).
What this recipe does offer is a great back to basics foundation. Sure, I used modern technology, but you could just as easily go Laura Ingalls Wilder on this one. I chose not to salt my butter because unsalted suits baking purposes better.
You could mix in some roasted garlic and chives to make a fantastic compound butter. Add honey and cinnamon for a breakfast delight. The options are endless once you have your base. And don’t forget that gorgeous buttermilk to keep you warm at night.
10 minutes isn’t long at all to the perfect butter and buttermilk recipe. If you’re going to use it anyway, why not be confident in the ingredient list?
Happy Snacking!
xoxo,
Kitten
Note: I used both the products made from heavy cream to make my mother a delicious buttermilk birthday cake. I used the recipe from here. I probably won’t get around to posting that recipe on Kitten in the Kitchen, but by Jove it was delicious. Give it a look at.
I am lucky enough to come from a very loving family. I have in my life, or have had until a less fortunate time in life when they passed, two sets of grandparents, a set of great-grandparents, a fantastic mother and father, a “sister” who we were all lucky enough to get to know during her studies in the US, a wonderful brother-in-law, a slew of aunts, uncles, and cousins, all of Robert’s family, and, lastly, my only biological sister, Rachel.
We went to the Enrique Iglasias concert in 2015 because we could think of no better way to spend the night than with a sexy Spanish man.
Rachel is the shit. She is strong. She is crazy smart. She’s fun to be around. She’s sassy and spirited. She has talent up to wazoo. Sure, she’s beautiful, but she’s a hell of a lot more than that too.
When I got divorced and didn’t have anywhere to go, my sister and brother-in-law welcomed me into their home. It was the kindest most generous thing anyone has ever done for me. There’s no way I could have gotten through such a hard time without their love and support. I am constantly trying to find a way to repay their immense kindness.
Luckily, I have on a one up on her in the cooking front. Our parents might have loved her longer, but I can tie the race with a good dessert for family get-togethers. I feel fairly confident that I am the better cook of the two of us (Sorry, Rae. Fair is fair.), for now. When you’ve got a sibling as amazing as my darling sister, it’s important to work what you’ve got. 😉
Hey Hey Hey life in the Dream House
Barbie Dream House Experience, circa 2014
Up until recently, within the last few years, my darling sister, in all her beautiful, smart, sassy glory, sustained herself mostly on frozen pizzas. After she and my brother-in-law bought their house, things began to change. Slowly at first, but now the girl is turning into a bonafide home cook. Rachel can grill like a champ. If you visit her in the summer, ask her to make the grilled chicken caprese. It’s legit amazing.
My high school Graduation, back in 2010.
It’s happened a few times where I’ll have her over for dinner and the recipe I make turns into a staple at her home. Nothing fills me with more pride than being able to put a delicious meal into my family’s bellies, even if it’s through sharing a recipe via Kitten in the Kitchen. Rachel made a whole chicken in the Crockpot the other day, and so, obviously, it’s time for some chicken noodle soup. I teased that I would write this on my “Playing (Whole) Chicken” post, but I decided to push the recipe forward so that Rachel could have some fantastic soup.
If you plan on using store bought stock, scroll down to the part where I actually make the soup.
First things first. You need to make some stock. I did this in a pot, because I was home all day, but I’ve had just as much success making it in the Crockpot for an 8-10 hour setting on low.
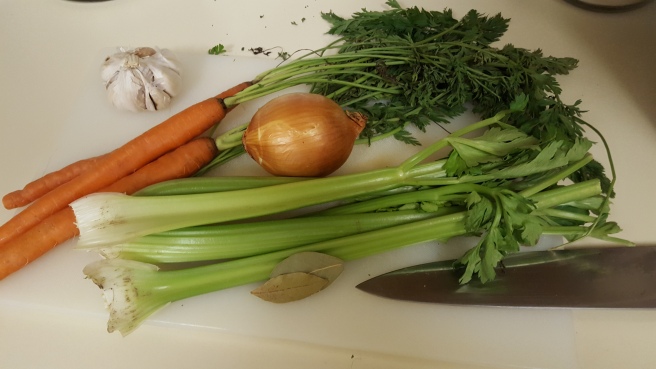
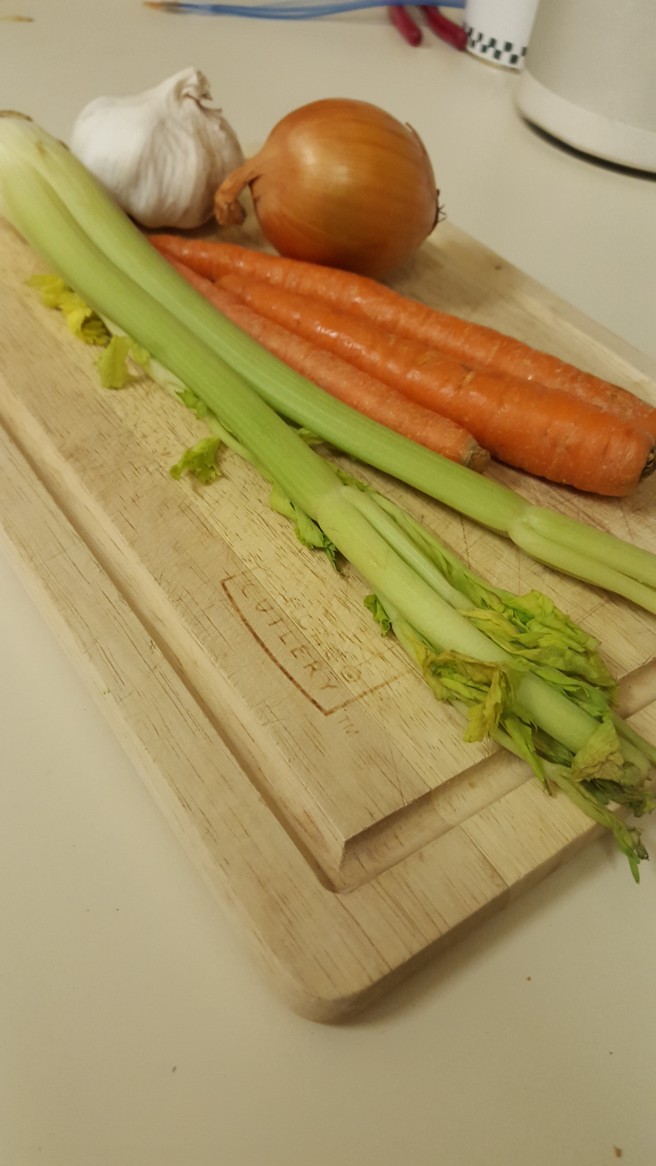
Assemble your ingredients:
Chicken carcass, cooked
4 carrots, with green tops if available
3/4 onion, quartered
5 garlic cloves, whole
1 bay leaf
Prep your ingredients. Peel garlic, peel onion. Wash carrots and celery, cut off the heads and feet if necessary. I don’t bother peeling the carrots for stock because they’re just gong to be tossed out anyway. If you have any veggies that are starting to wilt and be past their prime, this is a great use for them. If you have carrots with tops, they make a fantastic stock.
Put all of your ingredients into a large stock pot, order doesn’t matter. Fill your pot with water until all of your meat, bones, and produce is covered. Bring to a boil, then turn to low. Cover, and let simmer for a few hours. I’ve learned the hard way it’s a good idea to cover your stock. If left uncovered, you need to keep filling the pot with water as it evaporates out. You lose a lot of depth of flavors that way. No sense in working this hard just to have it vanquished by an uncovered pot.
Now is a great time to do something productive. You could do laundry, wash the dishes, vacuum, whatever. While I did some of those activities, I mainly did the most productive thing of all: Cat cuddles & Netflix. Hey, someone’s gotta do it. A few episodes of your favorite show later (around 3 hours, give or take), your stock is ready to be handled.
Like mother like daughter.
If you plan on turning this into soup right away, you can ignore the following procedure. I had some time between the stock was done and when I needed to make dinner for when R got home. Long enough to worry about the temperature of the stock. After it was done stewing, I immediately dumped a tray of ice cubes into the pot, and put it outside. (Remember, Minnesota in the middle of winter. It’s like putting it in the freezer.) It’s hard to get stock to cool safely in an industrial kitchen, and even harder at home. Stir it once an hour to keep the edges rotating; that’ll help it cool more evenly. After two hours I divided it into two large mixing bowls, and put them back outside. It was still steaming, but this seemed to do the trick so the stock could cool. If you plan on having that waiting period between stock making and soup making, this process is so important. Keeping it in that medium warm state is bacteria heaven. Either keep it hot, or do your best to cool it down rapidly.
For your soup:
3 tablespoons butter
1/4 of an onion
3 cloves garlic
3 carrots
4 stalks celery
salt & pepper
parsley
oregano
paprika
thyme
a handful of pasta, I used a gluten-free rice pasta
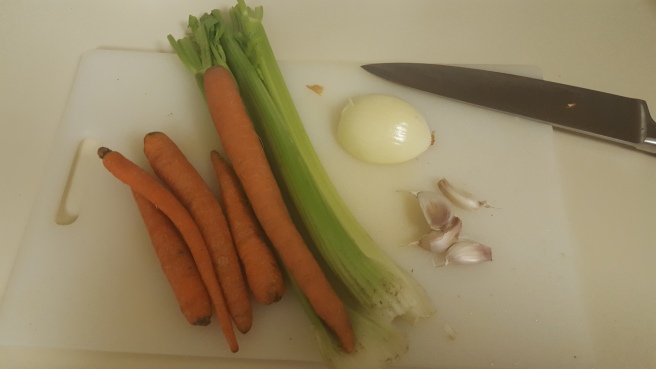
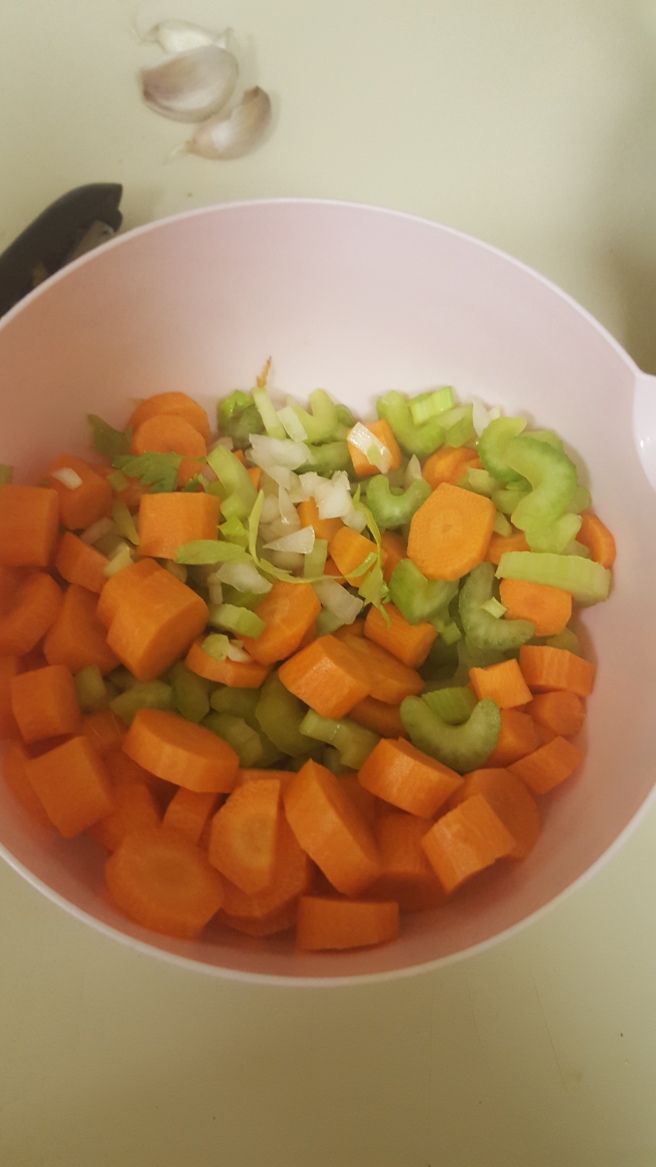
Chop, peel, and wash your veggies accordingly. Robert doesn’t care for onion, so I use less of that and more celery. We both like carrots, so I use a hearty amount of them as well. Don’t throw away your celery greens, they’re so yummy. The leaves have a really delicious delicate flavor. Just chop them up and toss them in with your onion and carrots.
Melt your butter in the same pot you originally made your stock in on medium-high. Saute in the butter for about 4 minutes. Crush and mince the garlic, add and cook for an additional minute. Stir frequently so the veggies don’t stick to the bottom.
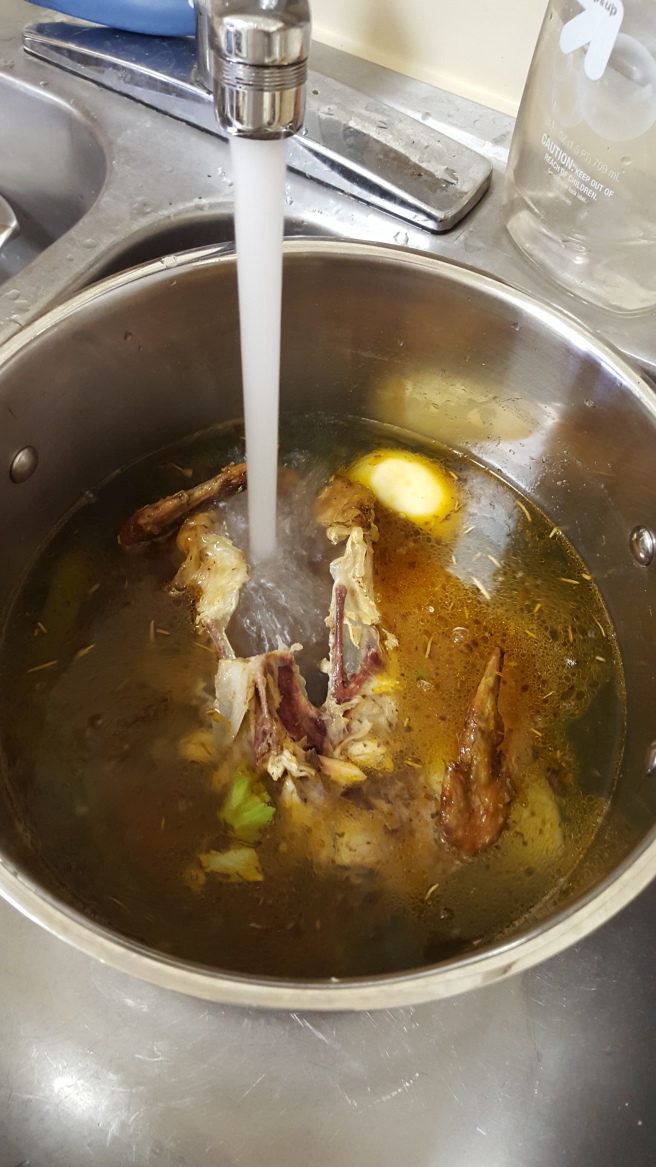
I choose to wait to strain my stock until now. Put a collindar or steam insert above your pot. Slowly pour your stock into the strainer, making sure you don’t overflow the strainer. One all the stock is in, you can start pulling all that delicious meat off all the bones. It’s a little putzy and labor intensive, but totally worth the result. If you have any leftover chicken in the fridge from the whole chicken you roasted, you could certainly shred that and throw it in as well. Reserve one ounce of cooled meat for the Cat.
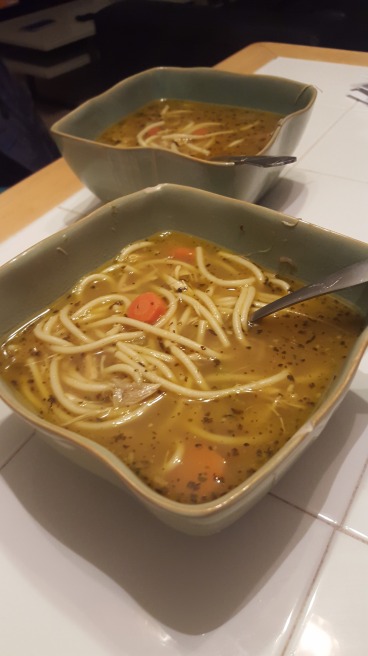
Bring to a boil, and let it go for about 10 minutes. Grab a handful of your favorite pasta, and break it in half so the noodles aren’t so long. Boil according to the package. In Jewish culture, it’s standard to boil your noodles separately and add them to the stock/veg mixture when you serve. This results in a beautiful clear broth. I subscribe to the lazier one pot method and cook my pasta in my stock. This does cloud up the broth a bit, but it also thickens it.
I season my soup now, while it’s at a rolling boil. If you followed my recipe, you didn’t season your stock at all. I choose to do it this way so I can season my stock appropriately for dishes from all over the world. Italian seasoning wouldn’t make sense in a Thai dish. With that being said, you’ll probably need a lot more salt than you think you will. Use your best judgement, and taste it once the soup has cooled a bit. Adjust the seasoning to taste.
DEEEELICIOUS. Enjoy your soup! Nothing warms up a cold winter day quite like a big bowl of chicken noodle.
For the stock:
Chicken carcass, cooked
4 carrots, with green tops if available
3/4 onion, quartered
5 garlic cloves, whole
1 bay leaf
Put all ingredients in a pot.
Fill pot with water until all ingredients are covered.
Bring to boil.
Cover pot, and turn to low.
Simmer for about 3 hours.
Cool for use later, or use immediately.
For the Chicken Noodle Soup:
Stock, with chicken carcass OR store bought stock with cooked chicken
3 tablespoons butter
1/4 of an onion
3 cloves garlic
3 carrots
4 stalks celery
salt & pepper
parsley
oregano
paprika
thyme
a handful of pasta, I used a gluten-free rice pasta
Melt butter in large stock pot.
Prep vegetables by peeling, dicing, and chopping as necessary.
Saute veggies in butter for about 4 minutes.
Add garlic, and saute for a minute longer.
Strain stock into the stockpot, making sure to pull all meat into the pot, and discard all bones and cartilage.
If adding any other chicken, shred and add to pot.
I remember back when I was a little girl living with my parents my mother would have a panic attack every time I would pick up a Chef knife. It wouldn’t matter if I was cutting a watermelon, chopping an onion, or slicing a chicken breast. Every time she was present, she would cover her eyes and shriek, “I can’t watch!” and just wait for me to accidentally cut off my entire hand. Well, that never happened.
And boy am I glad her endearing fear of me maiming myself didn’t transfer to me through osmosis. I use my Chef’s knife every day, and in almost every meal. Interestingly enough, I don’t usually use it for chopping or slicing most often. No, the most often used action is for smashing. Garlic, specifically.
You need to smash the garlic to get the skin off. You can’t chop the garlic, or put it through a garlic press, unless you get that pesky skin off. I know that you CAN buy the pre-minced stuff. I have indulged myself in it my fair share of times. No matter what though, I always come back to the whole head of garlic. Nothing tastes quite as good as a freshly smashed and chopped clove.
Don’t know how to smash garlic without accidentally cutting off your entire hand? Well, it’s easy! Simply lie your clove on a cutting board. Place your chef’s knife (a paring won’t work. Don’t even try it.) on top of the clove, sharp side pointing away from you. Steady the handle with one hand, and quickly bring the heel of your hand down onto the side of the blade. With any luck, your garlic should be nice and crushed, and will pop open on the sides. Delicious. Then you can just peel your garlic and you’re well on the way.
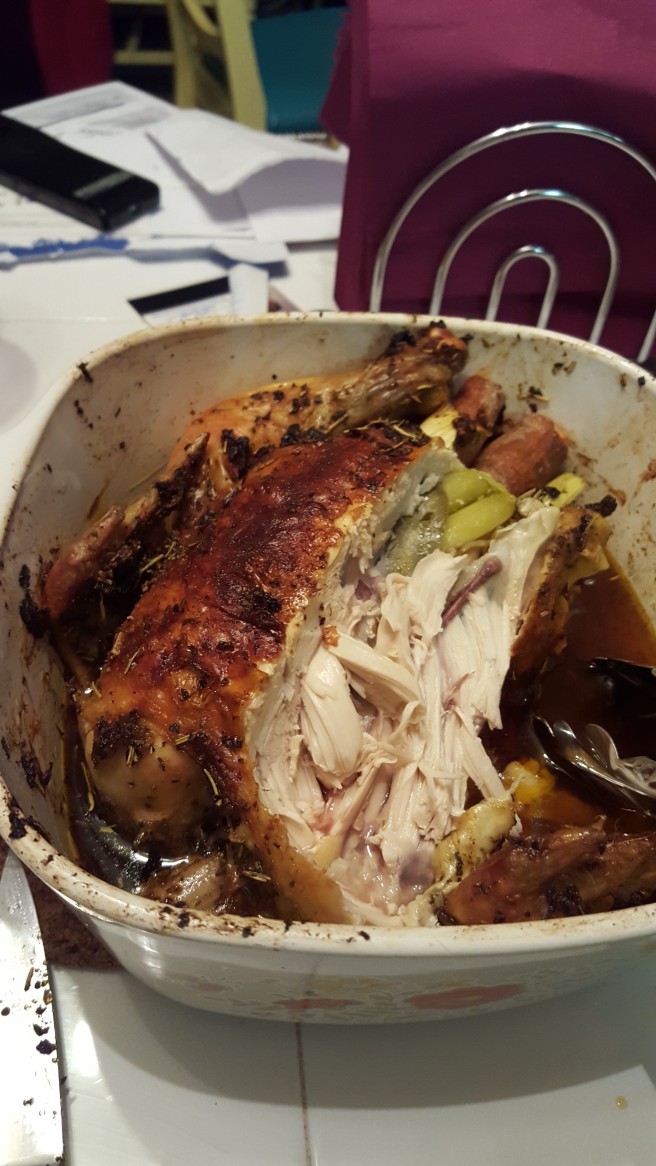
I can tell you this, there’s no way I could make a delicious whole chicken without some nice fresh garlic. They go together like peas in a pod. I make whole chickens on a regular basis. Not only is it delicious as hell, it’s also crazy cheap. A whole bird will run anywhere from $5-$12 depending on it’s size, if it’s cage free, on a vegetarian diet, so on and so forth. Even though I don’t think the birds taste any different, I normally try to buy a mid-range chicken. Even if it doesn’t make a difference to me, it certainly makes a difference to the chicken. Let’s vote with our pocketbooks, eh?
Even more people are afraid of making whole birds than are afraid of smashing garlic. Fear not, my friends! Whole birds are super easy to make, they just require a bit of patience. For an average chicken, it’s a safe bet to say it’ll take an hour and a half to cook, so prepare accordingly.
First thing’s first, gather your ingredients. You’ll need:
Onion
Carrot
Celery
Garlic
Bay Leaf
Paprika
Rosemary
Oregano
Parsley
Salt
Pepper
Olive Oil
Butter
Start with your onion, carrot, celery and garlic. I don’t even bother to peel my carrots. I just chop off their heads and their feet, and give them a good rinse. Same goes for the celery. Chop the stalks in half, and set aside. Smash a few cloves of garlic, and quarter and peel your onion.
Rinse your chicken in the sink, and stuff it with your freshly prepped veggies inside the cavity of the bird. (If you have all the gizzards and giblets, you could certainly make something with them. I either throw them in stock or just throw them out.) After all of your veggies are in, slide the bay leaf under the breast bone. Le yum. I use a dried bay leaf. Obviously fresh would be far more flavorful, but this isn’t France and a girl has to do what a girl has to do.
Stuff your chicken in a most un-ladylike manner
Throw that in your baking pan. I like to use an 8″x8″. Next, make a paste with your seasonings. The olive oil is your liquid, and just mixy mix until your happy with the flavor profile. I used what’s listed above, but never measure. If you prefer a more bland basic chicken, just use poultry & Italian seasoning. Lastly, put two tablespoons of butter atop your bird. That way when it bakes you get a nice brown crispy skin. YUM.
Put it into your pre-heated oven at 350°. Check the temperature after an hour, but it probably won’t be ready for an hour and a half. The internal temperature should reach 170° in the thickest part of the bird.
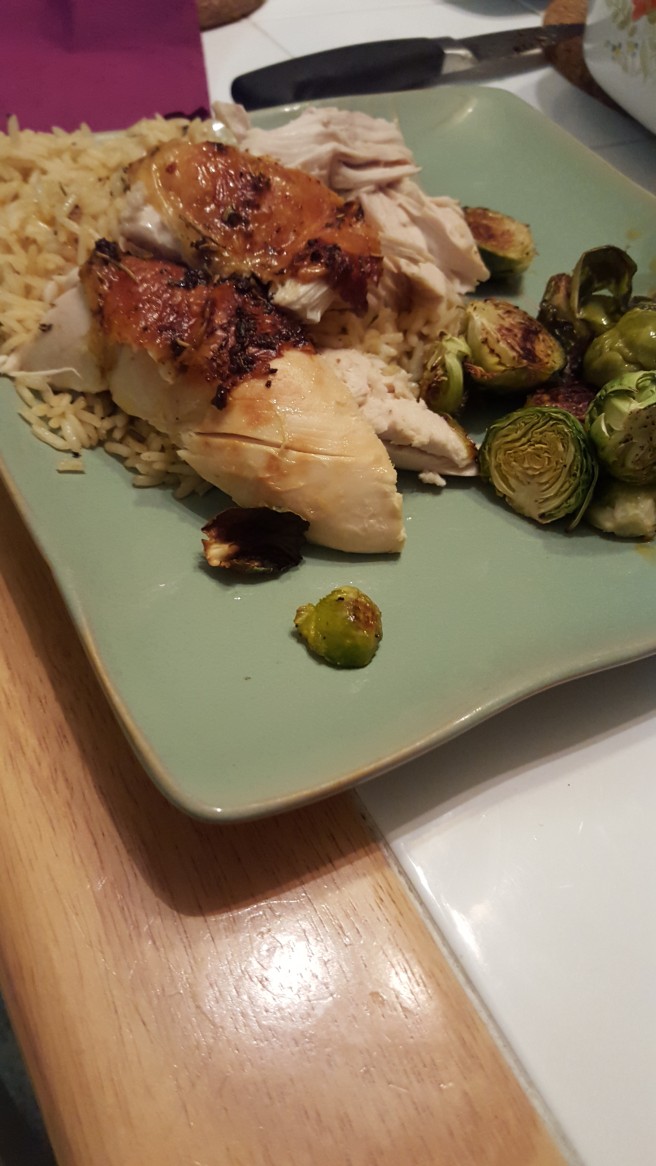
Let it sit for 10 minutes before you slice into that beautiful beast. The skin should be golden and crispy, and it should be sitting in a substantial amount of it’s own juices.
Pour those delicious juices over rice & veggies. Save the rest, along with the carcass, for a fantastic stock (and homemade chicken noodle soup!) This is such an easy recipe it doesn’t even warrant putting the whole bit down at the bottom.
Haley also adores this recipe. Cat knows her stuff. Have your bird, and eat it too.
Robert & I are creatures of habit. Much like cats and children, we thrive with routine. We fall into happy routines easily, and have no desire to change them. Mixing it is not necessary when you’re happy as clams together.
Every night after long days of work, and cleaning up after dinner, we settle down to cuddle the cat, eat ice cream, and watch Netflix. Usually a gritty crime series, Doctor Who, or a cooking competition. My all time favorite is Chopped. Ted Allen gives me life.
Watching Chopped, there’s always a few cliche things that happen in each episode, without fail. They are:
The “I’m not pleased with my presentation…”
Followed directly by “but I’m confident in my flavors.”
Someone decides it’s a good idea to fight with Marc Murphy (note: it’s not a good idea.)
Someone sets something on fire
Someone cuts themselves and has to put on about a million gloves.
Someone forgets half the basket ingredients, and tries to justify it with
“The time just got away from me.”
Everything is served “en crout”
Someone makes a bread pudding or french toast
and tries to make it sound legit by adding some French words in.
Last but certainly not least, the ice cream machine.
Everyone on Chopped thinks they know how to make an ice cream. They throw crap into a bowl, and throw that into the ice cream machine. They have never made it before, yet somehow they think this is a wise choice. It melts, and they call it a semifreddo. They over churn it. They don’t add enough eggs. It tastes terrible. And without fail, someone decides to use the ice cream maker.
Usually I just accept this as a fact of the show, and I do my best not to roll my eyes. Sometimes, I get really cheesed off though. They just throw things into the ice cream machine, and (occasionally) it turns out perfect. Please, if they can pull it off on Chopped I could certainly pull it off in my own kitchen.
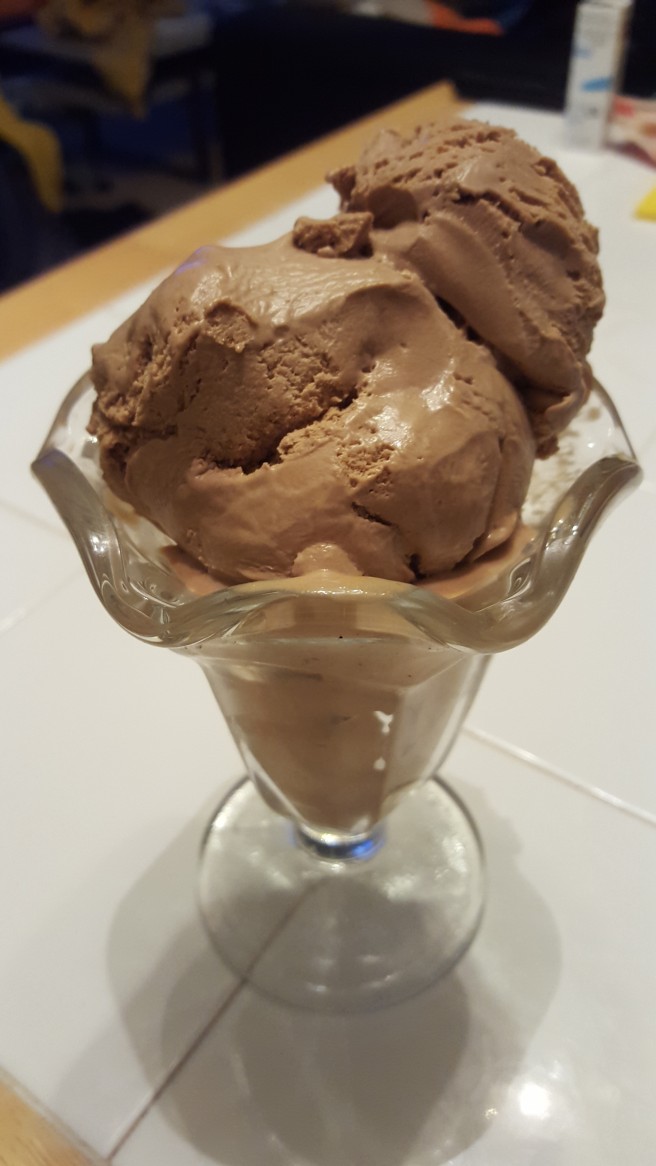
Let me set the record straight. I am an ice cream lover. All the flavors, all the different base varieties. I love them all. Should you ask me what my favorite food is, I will say ice cream without skipping a beat. I’ve made it at home quite a bit. I first got an ice cream machine from my mother back around 2012 for Christmas. It did the job, but it didn’t quite freeze the ice cream hard enough. In Christmas 2014 Robert upgraded me to the Cuisinart machine I now use. It still doesn’t give a good hard freeze, but its a pretty big step up from my original machine. I just pop my ice cream into the freezer for a few hours after its done churning and it gets to be pretty perfect.
In the spirit of Chopped cooking, I didn’t measure shit. I just dumped it all into a bowl, threw it over a double boiler. I am kicking myself in the face for my devil-may-care attitude. This ice cream turned out almost perfect. I didn’t follow a recipe. I literally measured nothing. And since there were no measurements, I had nothing to make note of to re-create this splendid ice cream. It’s just like on Chopped. -__-
Unlike I Chopped, I do know what I’m doing. Here’s a rough estimate of the ingredients I used:
1 Cup Cream
1/2 Cup Whole Milk
1/2 Cup Sugar
1/2 teaspoon Salt
1 tablespoon vanilla
6 egg yolks
2 Tablespoons Molasses
3/4 Cup Hot Fudge
First things first. Get a pot of water going for your double boiler. It’s nice to start this first so that you don’t have to keep waiting around for your water to boil.
Throw your cream into a stainless steel mixing bowl. This bowl will be used over the double boiler, so it’s important you don’t use plastic. Glass would work as well, but I don’t know anyone who actually has any glass bowls. Using a hand mixer, whip your heavy cream until it at least doubles in volume. It should be between frothy and soft peaks.
Add your yolks, and get your mixture over the double boiler. This is a custard base, so putting the yolks over this double boiler will ensure that your custard isn’t full of raw egg. As soon as you get it over the double boiler, start whipping it. You need to whisk it constantly or you’ll end up with scrambled eggs. Yuck. Keep whipping this over the heat for about 3 minutes. I didn’t take pictures of these things partially because I’m a scatterbrain, and partially because I was convinced it wouldn’t turn out quite right.
Add the milk, sugar, salt, vanilla, and molasses. Beat this constantly until the mixture is thick enough to coat the back of the spoon. Be patient and keep whisking away. If you stop, the eggs can scramble. Keep fighting the good fight (whisking your delicious custard).
Once your mixture is nice and thick, THEN add in the hot fudge. The fudge is pretty dense and heavy, so adding it too soon can make it seem like your custard is thicker than it really is. Should you go down that path, it probably wouldn’t be the end of the world, but it may lead to raw yolks in your custard.
Put the custard into the fridge for at least a few hours, but preferably over night. Since it’s the middle of winter in Minnesota, I just through it outside for a few hours. The great outdoors is commonly referred to in these parts as “the big fridge”. With my high class culinary career, I like to think of it as “the walk-in cooler.” It’s nice to let it sit overnight in the fridge because it lets the molecules get their structure in order. Baking is science, you guys.
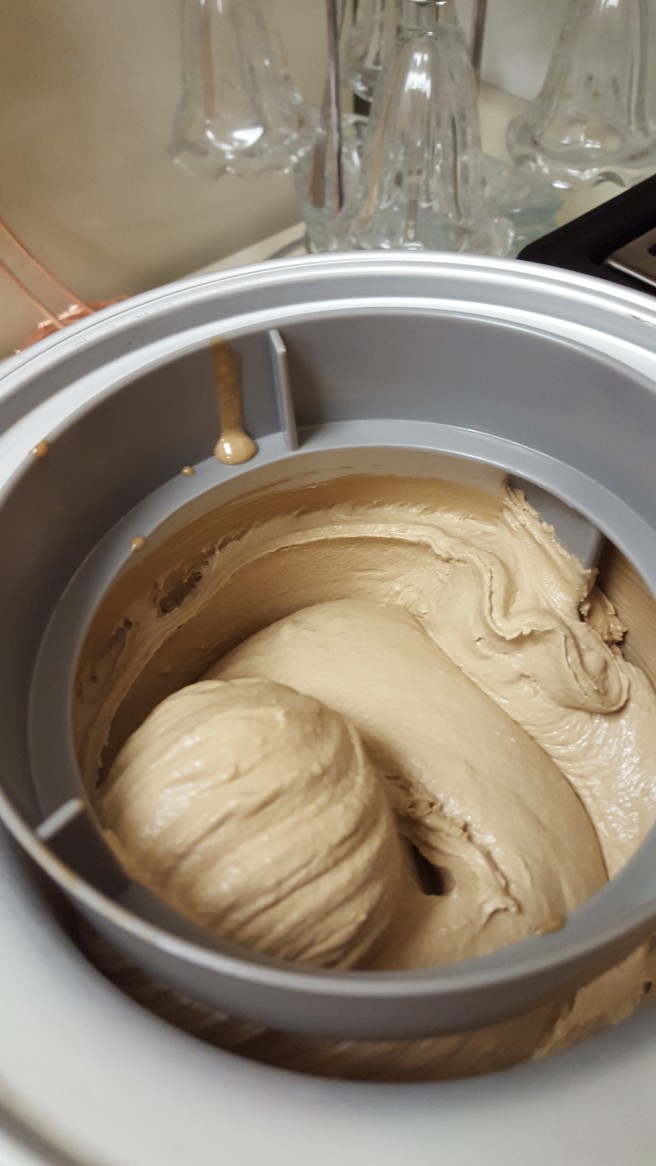
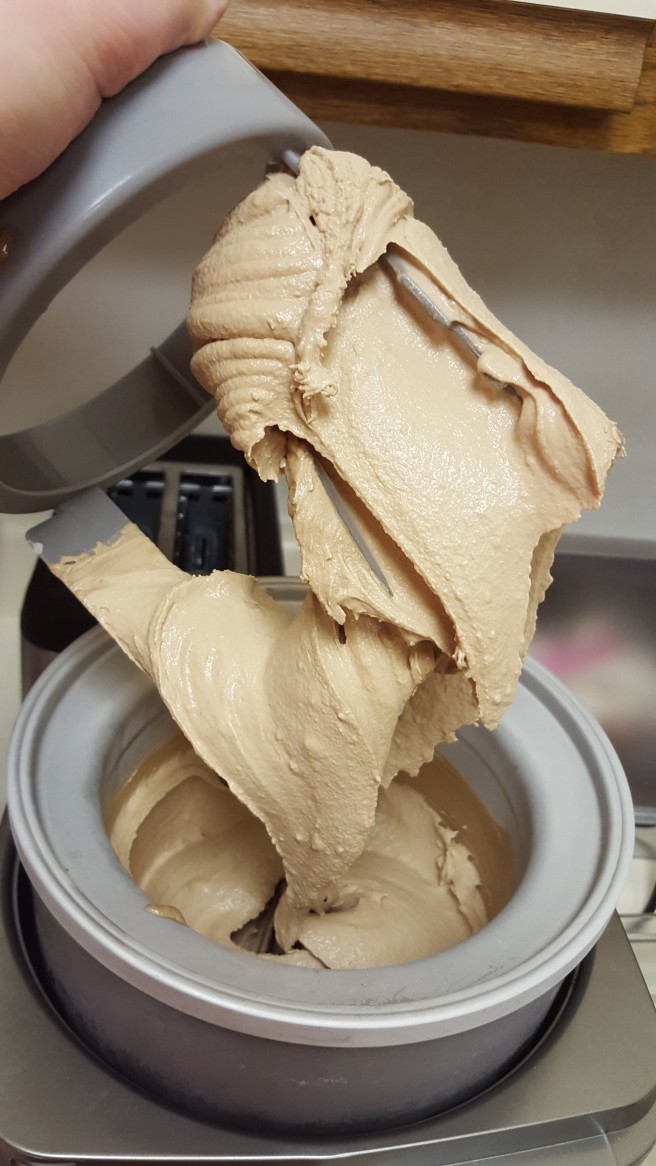
After it’s had time to cool and rest, throw that nonsense into your ice cream machine! Let it churn for about 20 minutes. The nice thing about most home ice cream makers is that they don’t get cold enough to over churn your ice cream. So let it go until it reaches the consistency of soft serve.
Freeze it for a few hours for best results, but it’s good to eat whenever. If it gets too firm in your freezer, I just let it sit out for a while before scooping. It’ll last quite a while in the freezer, but you’ll probably eat it all in a few days. 😉
Best served with cat cuddles and Chopped. (and maybe an upcoming recipe for homemade chocolate syrup to satiate R’s chocolate cravings?! One can never know.)
Fudge Ice cream
Ingredients:
1 Cup Cream
1/2 Cup Whole Milk
1/2 Cup Sugar
1/2 teaspoon Salt
1 tablespoon vanilla
6 egg yolks
2 Tablespoons Molasses
3/4 Cup Hot Fudge
Start a pot of water for a boiling water.
Whip heavy cream in stainless steel or glass bowl until soft peaks form.
Mix in milk, sugar, salt, vanilla, egg yolks, and molasses. Beat constantly until the mixture is thick enough to coat the back of the spoon.
Mix in fudge.
Refrigerate mixture for at least a two hours, preferably over night.
Another day, another blog post that I should have taken more pictures of. Such is life.
I had today off work and had many grand plans for all the things I would accomplish today. I was going to finish my monthly meal plan (done & too be published for your enjoyment soon), go grocery shopping for next week, do some yoga (did that too), finish the laundry, get the kitchen clean, and make a fantastic dinner.
And then it snowed. And I accomplished nothing.
“But, Kitten! Half of those projects take place inside your own home! There’s nary an excuse for accomplishing squat!”
Well. Fudge you.
And I do not mind if I do.
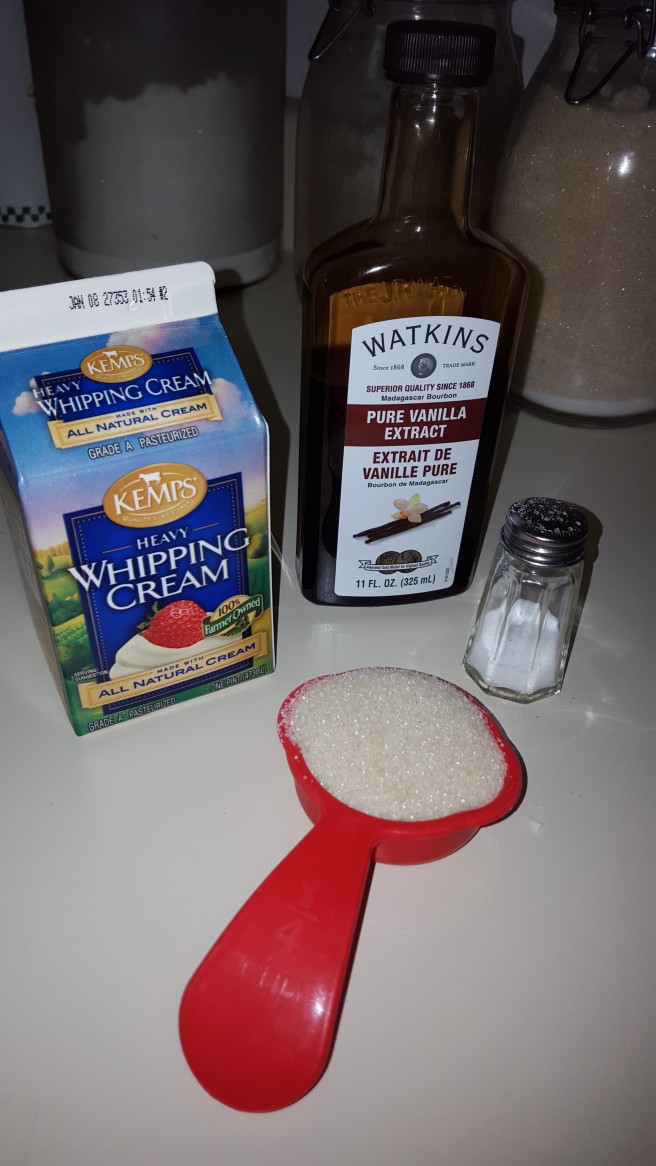
This is a recipe I go back to time and time again. It’s rich, it’s delicious. It’s utterly sinful. All qualities I look for in a dessert. The ingredients are simple:
6 oz Chocolate (use the fancy stuff. You know you want to.)
2 Tbsp Butter
Pinch Salt
1 tsp vanilla
1/2 Cup half & half
Use the fancy chocolate. You can chop up a bar or get the nice chocolate chips. I’m want to use whatever the fudge (see what I did there?) I have laying around the pantry, today it was Hershey’s. I recommend Hershey’s, Ghirardelli, or literally anything that is not Nestle. (Stop buying their products or stop thinking of yourself as a decent human being. The choice is yours.) I used milk chocolate today, but semi-sweet or dark chocolate is my favorite.
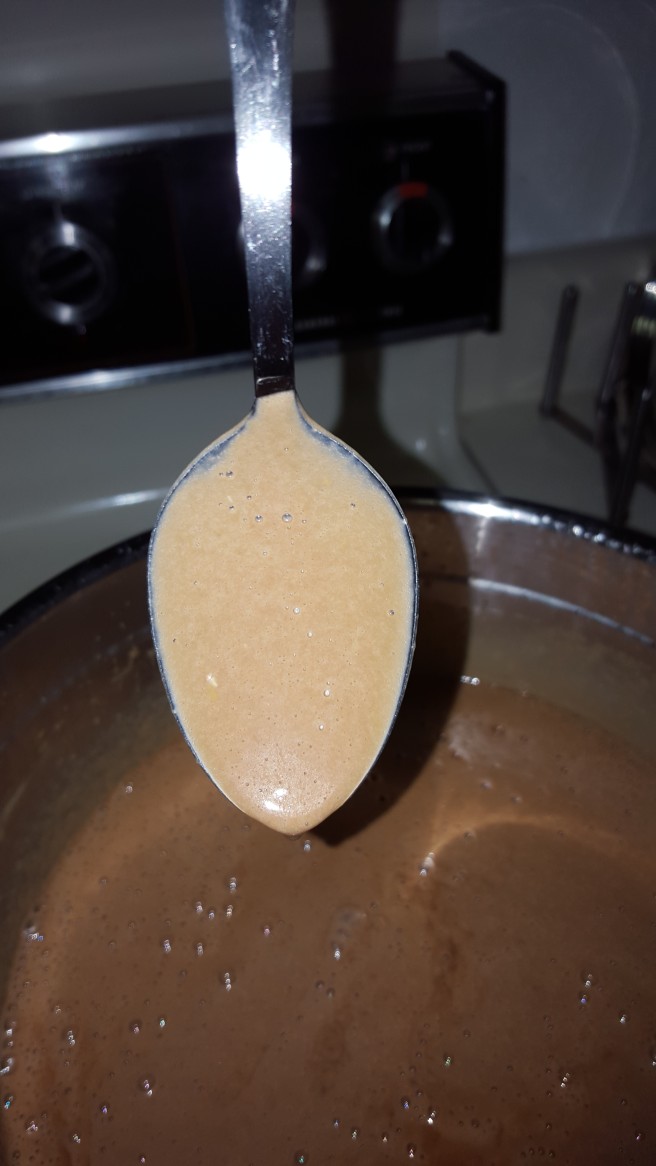
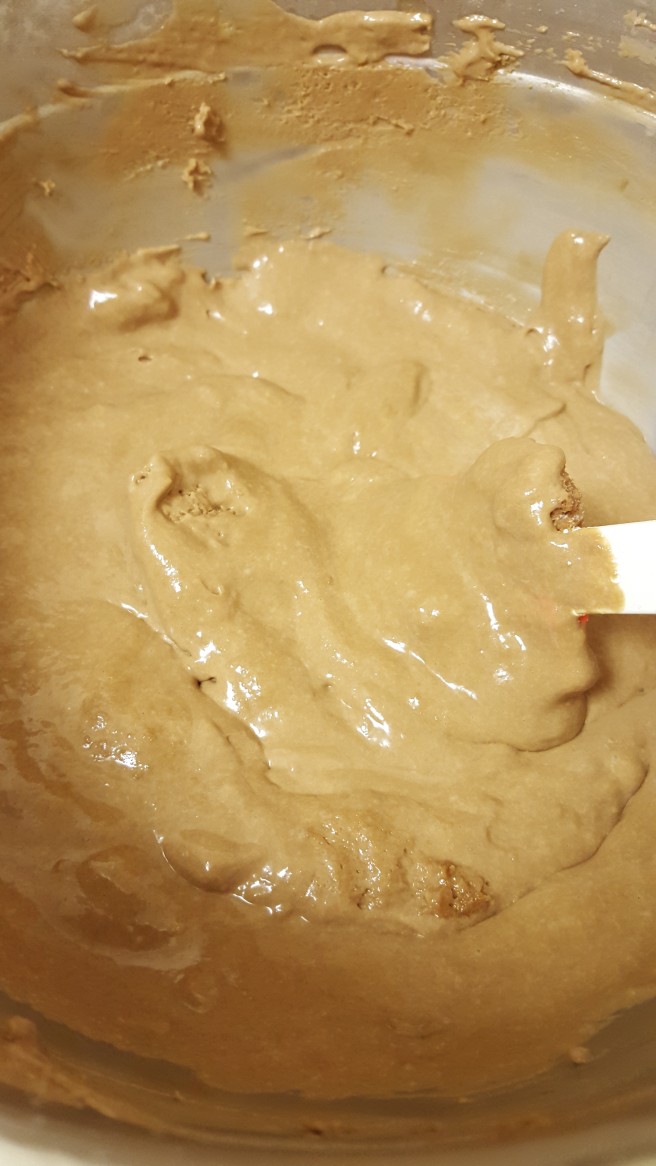
Simply measure out your ingredients, and throw everything into a blender or food processor excluding the half & Half.
Place your half & half into a 2 cup sized microwave safe measuring cup (or larger form of microwavable dish). Nuke that sucker for 90 seconds on high.
Pour your hot milk into your blender, and immediately blend on medium power for 1 minute. Scrape down the sides and blend again for 1 more minute.
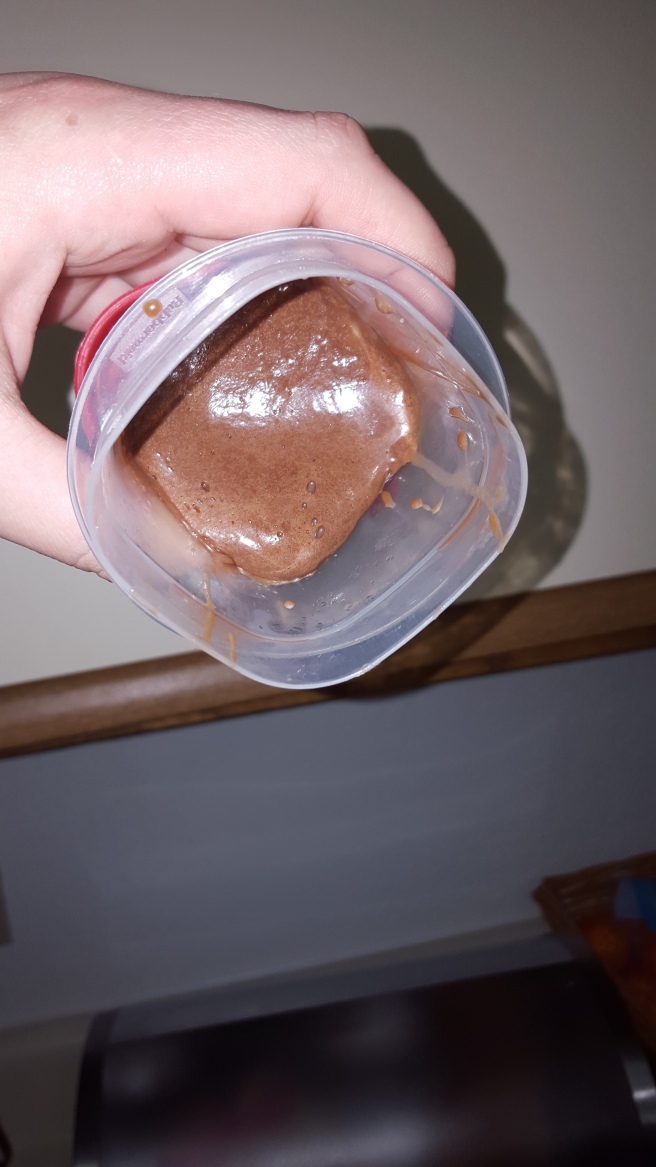
Pour it into an air tight container and eat it with a spoon store in the fridge for up to two weeks. Honestly, I don’t think it’ll last you that long.
The fudge will thicken when it cools, but just heat it in the microwave gently (for about 15 seconds at a time. For real.) and it’ll be a nice runny consistency again. Perfect for pouring over ice cream, fancy bars, or into fancy cocktails. This recipe makes approximately 1 cup of hot fudge.
“Kitten, why didn’t you take more (or any really) pictures of this recipe? And while I’m at it, there’s certainly less than 1 Cup of fudge in those pictures!” Because I was busy pouring this delectable hot fudge into an ice cream base, smarty pants. Hold your hats, friends. ETA on that post is tomorrow. It’s gonna be big.
Easy Home Made Hot Fudge
Ingredients:
6 oz chocolate
2 Tbsp Butter
1 tsp Vanilla
Dash Salt
1/4 C Sugar
1/2 C Half&Half
Place chocolate, butter, vanilla, sugar, and salt in blender.
In microwavable dish, heat half&half on high for 90 seconds.
Pour immediately into blender. Blend on medium for 1 minute.
Scrape down sides of blender & blend again for 1 minute.
This recipe can be found in it’s original format here.
For me, the holidays are officially over! I love spending time with my family, but I also love having a routine. I am a creature of habit, and I love making schedules and plans. How on earth could anyone expect me to function as an adult member of society without a game plan?! Making it up as a I go hasn’t benefited me much as an individual.
It turns out that writing a mere five blog posts isn’t enough for it to be habit to document my cooking like I’m exhuming Atlantis. Since making marshmallows & hot chocolate, I’ve made a lot of un-interesting dinners (i.e: “dump” slow cooker meals, chili) that simply haven’t been worth documenting. Then, the few times I’ve made something interesting (corn bread, and Belgian waffles most recently) I’ve been so focused on not ruining my recipe I forget to document!
I’ve also realized that I have forgotten to tell you the most important ingredient to my success in making everything I eat from scratch. Ready for this?
I meal plan.
Hiding in my meal planning “shame”
Yes. I am one of those people. I plan my meals a month in advance. I account for holidays. I think about what stocks I can make from bones and use in the following meals. It’s a huge undertaking WITHOUT adding in making everything from scratch.
Meal planning makes me feel like an adult. It makes me feel like I really have my shit together. For me, there’s nothing worse in the world than coming home after a long day of work and playing the “what should I make for dinner?” game. Hell no. Not on my watch.
Meal planning also added some much needed structure to my life. Before I started meal planning, I had an unnecessary amount of anxiety attacks directly connected to “ohmygod. how am I going to feed Robert? HE’LL STARVE TO DEATH IF I CAN’T FIGURE OUT WHAT I’M DOING!” It sounds dramatic, and that’s because it was. It was dramatically terrible.
We were also broke (read, more broke than currently.). Going to the store would usually cost about $300USD per trip. It was exhausting and financially draining. We’d probably do one or two big shopping trips a month, but we’d have to keep going back to the store for fresh produce, and to get ingredients we needed for making whatever random recipes came to mind that day. Shopping for food that you don’t know you’ll make is next to impossible.
For me, the choice to do a meal plan was a no-brainer. I asked R one day what his thoughts were. He didn’t really have any (“Whatever makes you happy, my love.”). So I signed up for a meal plan for one month. It was pre-made, on a budget, and had all the attached recipes. It only cost me a few dollars, and that one month changed my life. It reduced my stress by about a million percent, saved us a crap ton of money, and no more of the “What should we have for dinner?” game! Everyone wins.
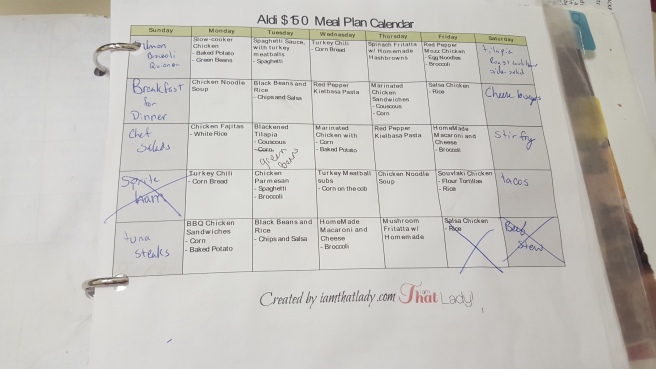
The meal plan that started it all.
Once a month I do sacrifice an hour or two of my time to make the meal plan. It’s worth it. Here’s my step by step process
Print out a calendar (it doesn’t even have to match the month. The one I use is just a big grid, really.)
Ask R if there’s anything he wants special this month. (Usually beef tips, beef stew, steak, hamburgers, beef anything really.) I really do love R, and he sticks with me through thick and thin. I always try and make sure at least a few of his special recipes get on the plan.
Check out the food blogs. Pintrest my soul away. Pull out some good recipes and print them.
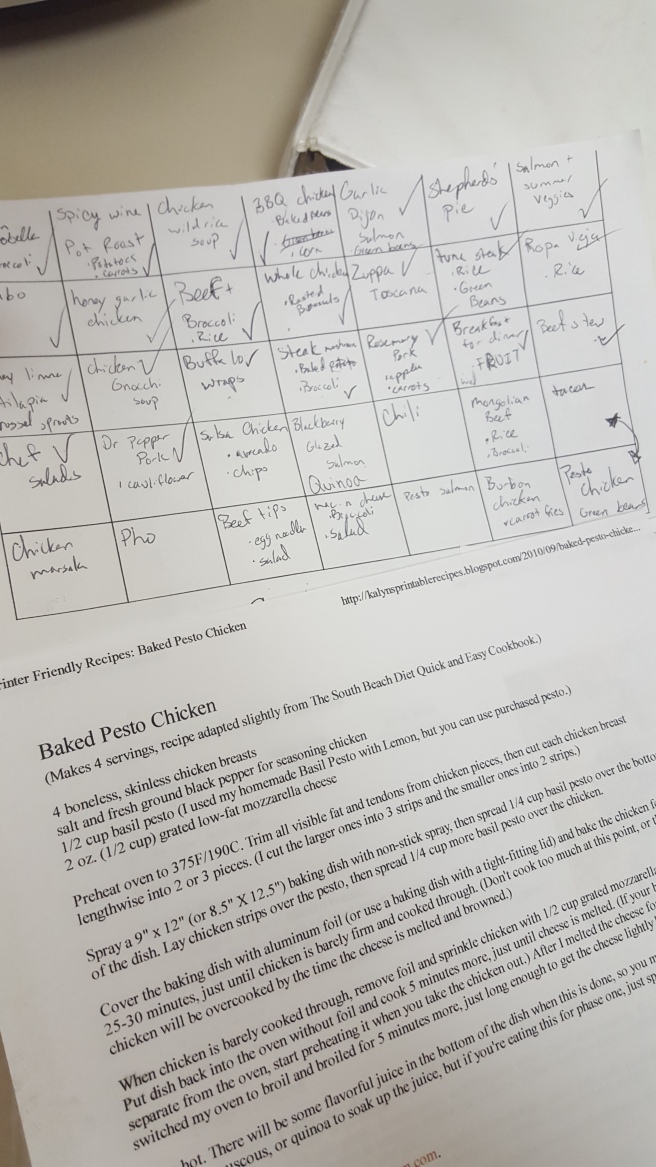
Drag out the archives. Between my internet finds, and recipes I’ve made before I..
The archives. The stockpile of sensational flavors.
Plop it all onto my grid into a somewhat sensical fashion.
Put it into a separate folder in the order you plan on making your dishes.
My monthly meal plan goes into this beaut. I can’t figure out how to rotate the picture though.
Once you make the dishes, recycle the recipes you didn’t care for & put the ones you like into your archives.
Things I try to keep in mind when making my meal plan:
Any holidays or parties coming up that we need to work around?
What will I have to prepare ahead of time?
Do I have at least one vegetarian meal per week? (I’ve been faltering on this one lately. I don’t think R has minded.)
Do I have two meals next to each other that are oddly similar?
Do I have two beef meals in one week? (Robert would love this. I do not.)
We now go shopping once a week (on Wednesdays, since we’re off work) and get all the needed goods for that week. At home I make a list of exactly what we’ll need, and inventory it against our freezer/fridge/pantry contents. We only buy exactly what we need. It saves us money, and it saves us so much damn time.
I make large meals at dinner, so we’re able to bring leftovers for lunch the next day. If it’s a particularly large batch, I’ll freeze some and we’ll pull it out next month for dinner. Can’t get much easier than that. Most meals I make are for a family of 4-6. We’re a family of 2 (+cat). Since our lunches are taken care of by leftovers, and breakfast is usually something quite simple (Eggs & asparagus is my favorite), our food budget is quite small. We generally spend less than $400 a month on food for EVERYTHING we eat, and buy organic whenever it’s available. Our weekly shopping trip usually comes up to about $70 to take care of everything no problem.
Guys, I know it sounds like a lot of work. The first month I really recommend just going with a pre-made plan. It made it a lot easier to stick with that way. So it’s actually the second month that’s the most daunting. Look through your cookbooks, think about what your normally make. Then throw it a bunch of new stuff! It’s so easy to end up in a food rut, making the same things over and over and over. A simple word of warning: When you throw a bunch of new recipes into your mix every month (as I usually do) they won’t all be winners. Take it as a grain of salt, and move on. Tomorrow will be better.
To repeat myself one last time:
Meal Planning changed my life. I think it could change yours too. Give it a shot. See what happens. I think you’ll be pleasantly surprised.
The original meal plan I used, and that changed my life, is a $150 Weeknight Dinner Meal plan from I am THAT Lady. You can view it for free, or you can buy it and get the printables (totally worth it.) I can’t find the one that I used specifically, but there’s a wealth of resources available.
Let’s keep this one short and sweet since it’s to be linked to the homemade marshmallow post I’ll be putting out the same time as this recipe.
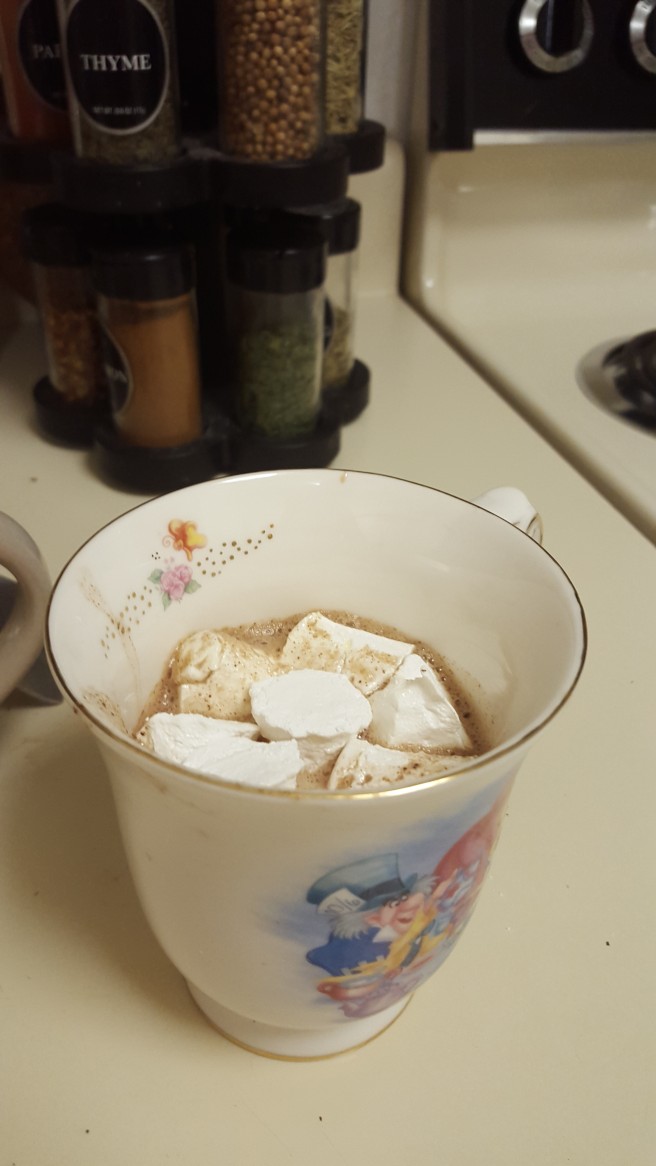
Robert gets a beige cup.
I get a pretty cup.
Long and the short, Robert loves chocolate. I plan on dedicating more than one blog post to this intense and pure love. Today is not the day. Just know that my goal is to create as rich and decadent hot chocolate beverage as possible, then smother it in marshmallows and die happy.
Here’s what you’ll need:
1/2 cup heavy cream
3 1/2 Cups Milk (we use whole)
1/3 Cup Granulated sugar
5 Teaspoons grated baker’s chocolate
1/2 teaspoon vanilla
Pinch o’ salt
Scald your milk. Scalding is heating your milk to just below boiling. Don’t let it boil. Boiled milk tastes funny.
Mix all the other stuff in. Stir it real good.
You’re done.
That’s it.
You did it
A+, my friend.
Put on equal parts marshmallow to hot chocolate.
If you love chocolate as Robert does, top with chocolate syrup.
This recipe is based off the brilliant version from Gimme Some Oven.
Note: If you chose to use cocoa powder that’s fine, but you’ll have to decrease the amount pretty significantly. Add it slowly, whisking all the way.
And the snow is tumbling down. And down. And down. It’s a downpour of snow. Reality is just as cold as that wind chill, am I right?
It snowed all night, it snowed all morning, it snowed most of the afternoon. A white blanket covered the earth. The traffic was terrible. A typical Minnesota day.
Luckily for me, Robert loves me. He let me use the underground heated parking this winter, for the second year in a row! This means that I get leave for work only slightly earlier than normal, whereas R has to shovel his car out and scrape his windshield. He has to bundle up and brave the arctic tundra that is Minnesota.
This man deserves some damn hot chocolate! Lucky for him, I am not frozen to the core and am able to make him a delicious homemade version, none of the store bought powder crap that most Americans know so well. R actually quite likes the store bought crap, but I think that’s just because it’s all he knows. It’s funny how some not very good flavors become nostalgic.
And nothing goes better with rich, dark, homemade hot chocolate than fluffy, creamy, sweet homemade marshmallows. MARSHMALLOWS.
Marshmallows officially fall into the category of food that I KNEW you could make from scratch, but never understood why one would want to. I understand now. I was wrong. They taste nothing like the store bought versions. Those pale imitations are nothing compared to the joy home made ones will bring.
The homemade marshmallows were surprisingly easy as well. I had almost all the ingredients at the house already, so all I had to pick up at the store was gelatin. Nice!
A word of caution before you dive into this recipe on your own. If you have never used unflavored gelatin before, you do not know it’s horrors. Gelatin is an animal byproduct. When you let it bloom (put it in water), it releases a smell unlike anything else in the world. It’s not a stretch of the imagination that it came from a cow/horse/pig. If you have any dietary restrictions about what kind of animal products you can use, make sure you check that out when you’re buying your gelatin. And don’t be discouraged by the rank odor that comes from the blooming gelatin. Once you throw a bunch of sugar and vanilla in it you can’t even tell. 😉
Here’s what you’ll need for the marshmallows:
.75 ounce gelatin
1 cup water, divided
1 1/2 cup Granulated Sugar
1 cup corn syrup
1/8 Teaspoon salt
1 tablespoon vanilla
1/4 cup powdered sugar
First, bloom your gelatin in a large bowl with a whip attachment for a stand mixer. A hand mixer would also work for this, but it’ll behoove you to drag out the big clunker for this project, I promise. All you have to do is put the gelatin in the bowl with 1/2 Cup COOL water. It’s important that it’s cool water. Hot water does crazy things to gelatin. Just set that aside. You’ve done good work, you.
Pro tip. At this point pull out a sheet of parchment to place your utensils & what not on. It’s about to get sticky and this makes clean up so much easier.
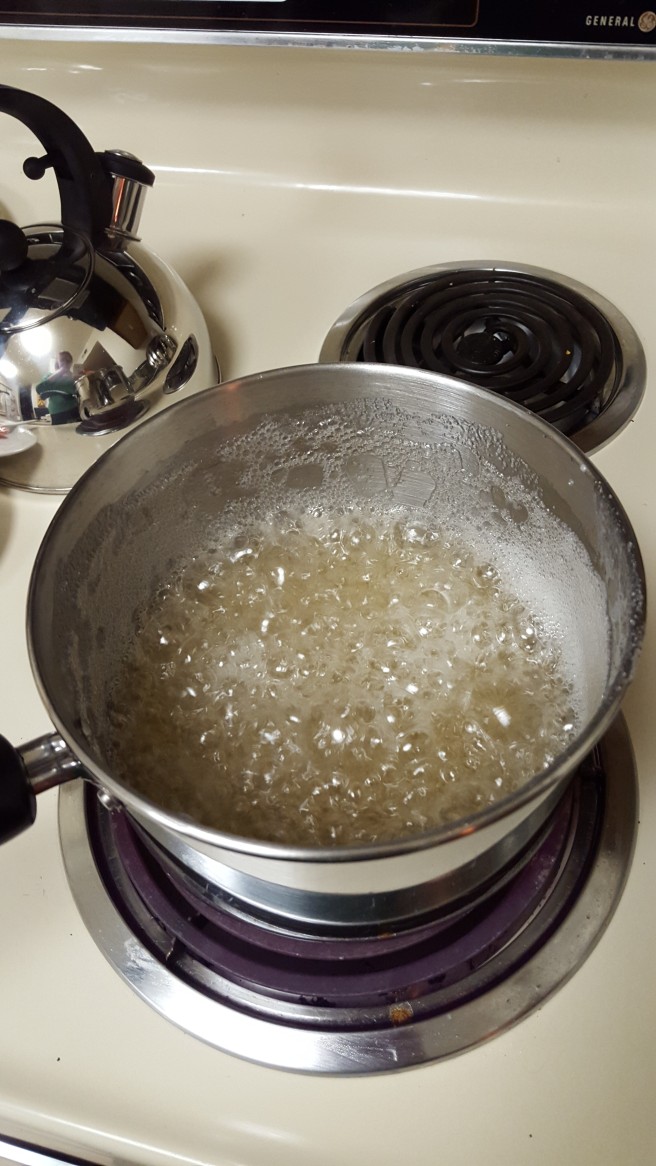
Next get a deep, but small, saucepan. The deep part is important. Throw in there the remaining 1/2 Cup water, corn syrup, granulated sugar, and salt. Give it a nice stir and place over medium heat. Be patient and keep it over medium heat until the sugar dissolves. It turns a milky color fairly quick, so I let some of the mixture run down the inside of my saucepan to more easily see how the sugar was melting.
After your sugar is melted, turn the heat to high. Bring your mixture to a boil. This part is nerve wracking, I won’t lie. I kept waiting for the bottom to burn, or boil over. Don’t touch the pot, and let it boil for one minute. Do not disturb during this time. At first the mix will boil up really high, that’s why it’s so important to have a nice deep sauce pan. After it raises up, it will immediately fall down. Do not fret. This is exactly what you want.
You can see near the top how high it boils up. Make sure that sauce pan is deep!
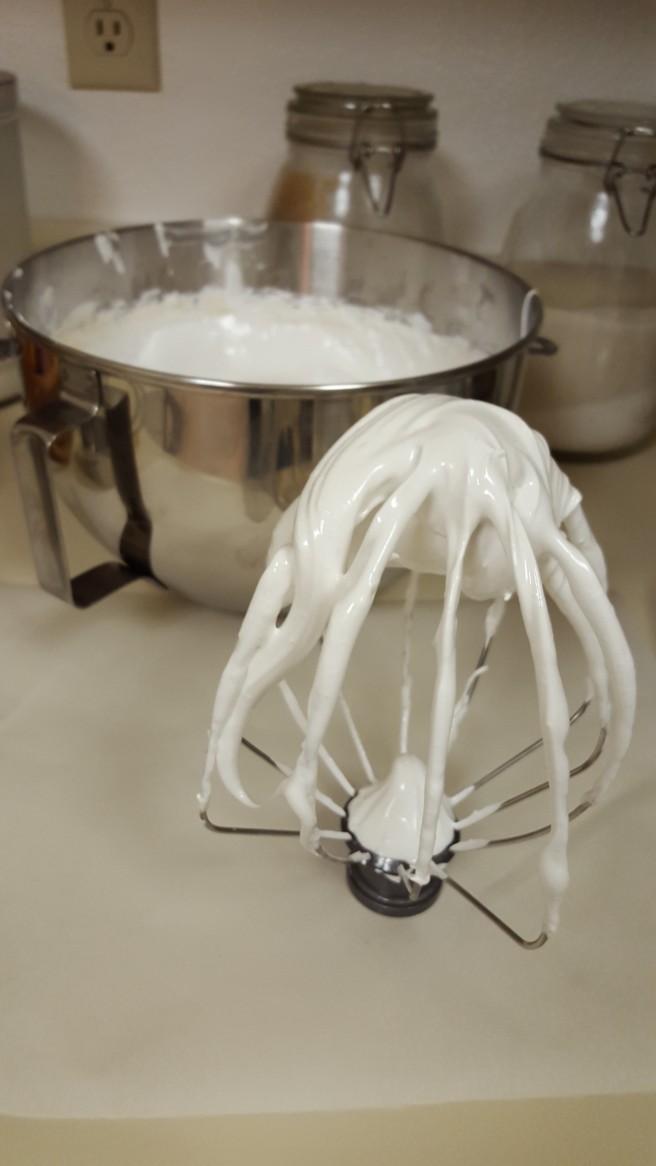
Get your mixer going on a low setting, and slowly pour your boiled sugar mixture into the bowl. After all of the mix is in, slowly work your way up to the mixer’s highest setting. At first a lot of steam will emit from the mix, but it’ll cool rapidly as you add air to the marshmallow. Set a timer for 10 minutes, and walk away. The urge to mess with it is real at this point, but just let it go. Fold some laundry, cuddle with your cat, whatever.
Cat & Kitten in their natural habitat.
Like mother like daughter.
When your mixture is ready, the bottom of the bowl should be just slightly warm to the touch, and the mix should be just a tisch above room temperature.
This is about 4.5 minutes into whipping. Coming along swimmingly, I must say.
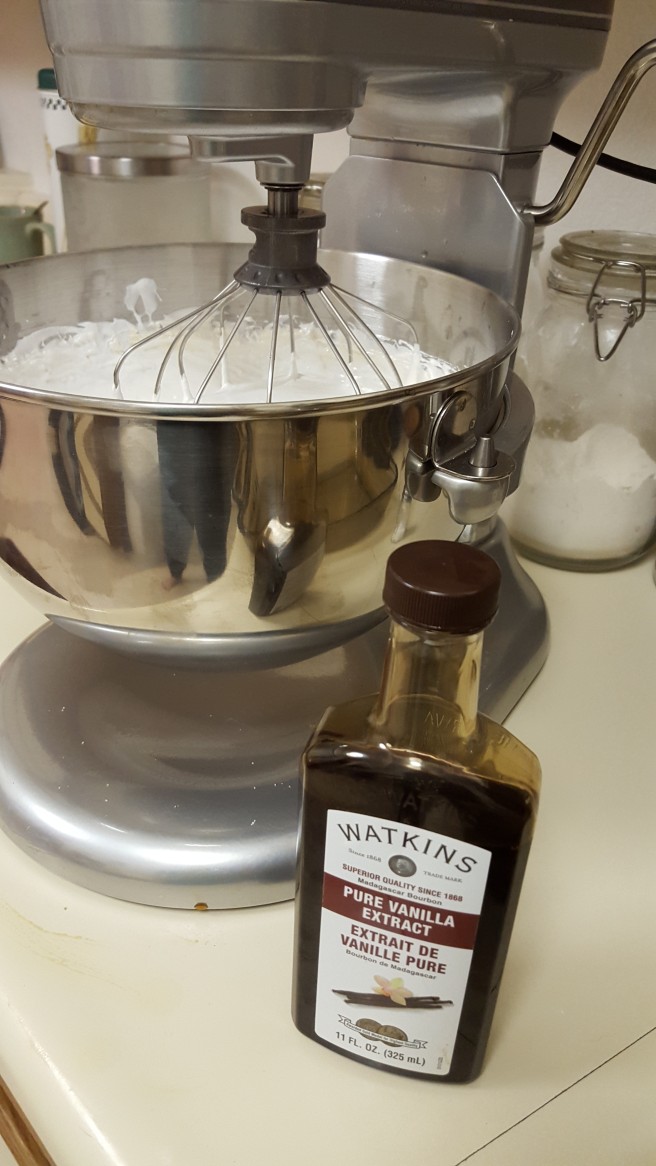
Add your vanilla, and mix it in on a low speed. Go ahead and buy the fancy stuff next time your at the grocery. It really does make a huge difference, and, honestly, you deserve it.
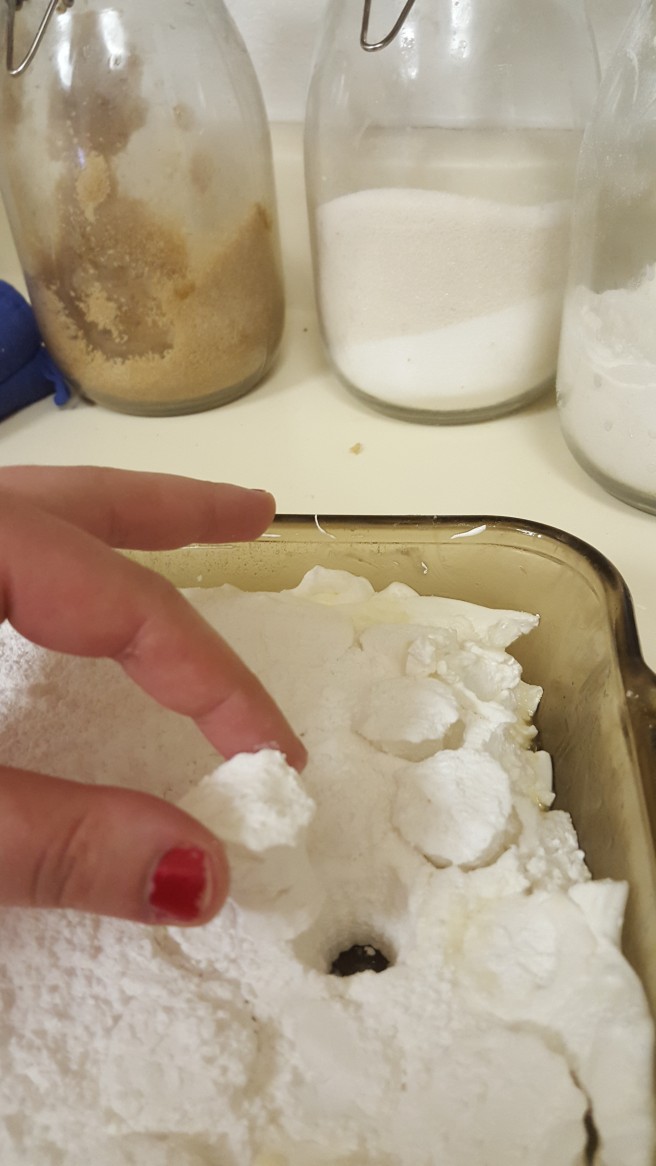
After the 10 minutes is up, your mix should be fluffy, shiny, and look all around delicious. Grease a 9×13* pan & a spatula well. Turn your mix into the pan, and do your best to spread it out evenly. Sprinkle some sugar over your sugar! With a sieve, dust powdered sugar all over the pan. The 1/4 cup looks like a lot at first, but some will soak into the marshmallow.
Resist (and fail) temptation to lick the bowl, whisk, and spoon. Rice crispies will never be the same. Nor will home made hot chocolate.
Notes: Just like there are fun flavored marshmallows at the store, you could easily flavor the ones you make to your liking.
Make sure you grease the pan RIGHT before you turn the mixture into it. Let it sit to long and it’ll pool in the corners. Blech!
I used a 9×13 pan this time, but the marshmallows are quite big. I think I might like to try two jelly roll pans next time.
I hear there’s versions of this that are made without using corn syrup. Ever made one? Pros & cons? Maybe I’ll get to it eventually and we can have a mallow party!
My darling father recently bought half a cow. HALF A COW. His intention was for him & my mother to keep a quarter of a cow, and my sister and I to split a quarter. One eighth of a cow is about a laundry basket full of cow. A LOT of cow. Needless to say, that didn’t happen.
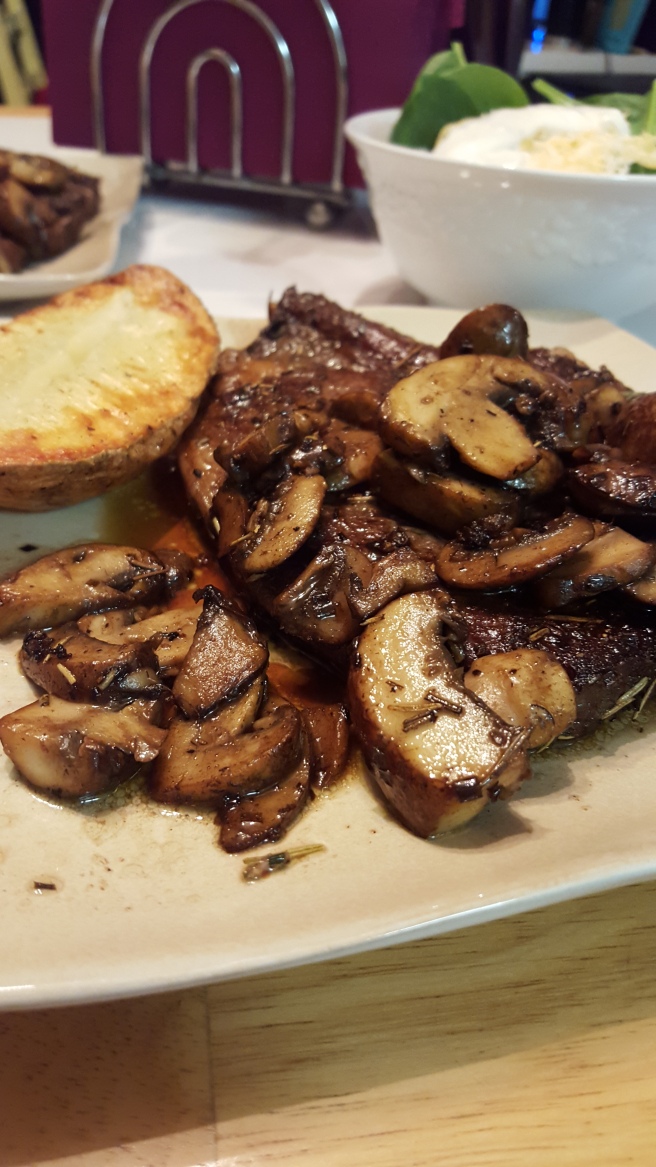
We don’t eat a lot of red meat, but if I’m going to have beef I want it to be a good steak. My favorite type of cut is rib eye, my second favorite is whatever is free. On behalf of my father, I present to you: STEAK! In this case, two lovely t-bones.
My steak recipe is a mix between Gordon Ramsay’s & Anne Burrelle’s. I was a vegetarian for a good portion of my adult life, so I never had to learn how to cook meat. Once I was back on the carcass train, I went in full swing. Gordon Ramsey had a video on youtube how to make a good steak. I followed it religiously… Until I turned on the Food Network and saw Anne Burrelle marinade a steak in olive oil and seasonings. It was a game changer.
For your marinade (I used approximately this much for two steaks) you’ll need:
1/4 Cup Olive Oil
3 Cloves garlic, crushed or minced
1 Tablespoon dried Rosemary
2 Teaspoons dried Chives
Throw your ingredients into a bag and give that steak a nice olive oil massage. Delicious.
Give it a good seal and put it in the fridge for at least one hour. Well, the pros say one hour, I say at least 3. I usually prepare mine the night before and let in marinade for about 20 hours!
Now I know what you’re thinking. “But, Kitten! It appears that you have used far more chives than you instruct us to use above in your marinade! But WHY!?!” I’ll tell you why. Because when I was dumping the chives in (life is too short to measure such things.) I dropped the bottle and more chives came out than I had originally intended. That’s why.
Now that your marinade is complete, take your meat out of the fridge and allow it to sit at room temperature for a bit before cooking. I’m not sure where I learned this tip, but the goal is to bring the temperature of the pan down less when you add the steak. That’ll help ensure you get a nice sear.
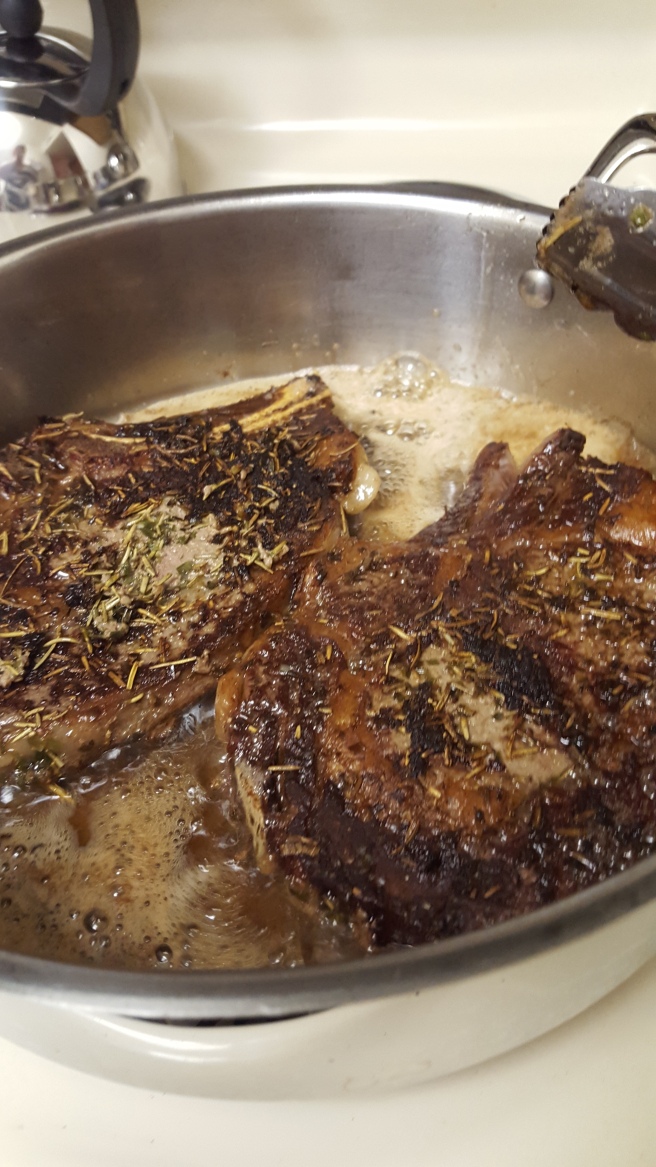
Put a large pan over medium high heat. You want to make sure your pan is plenty big enough so you don’t overcrowd it. Throw a nice butter pat in there, about 1 Tablespoon (or maybe a bit more. I won’t tell.) per steak. Allow the butter to melt and slightly brown
And in goes the steak! The crowd (and the garlic bits) go wild! Now that you’ve got your steak in the pan, DO NOT TOUCH IT. A good steak should only be flipped one time. (If you have to flip more than once, don’t stress it. It’s a steak, not FEMA.)
I’m not 100% certain how R likes his steak, but I like mine Medium Rare, so that’s how I cook it. It takes about 4 minutes per side, plus or minus. Just stick it in and let it go. Really, it couldn’t be any easier. 😉
Take your steak out and let it rest. This is an important step. Do not skip it. You could put it somewhere warm to rest (An oven on it’s lowest setting works great.), or just put it on the plate and let it chill out.
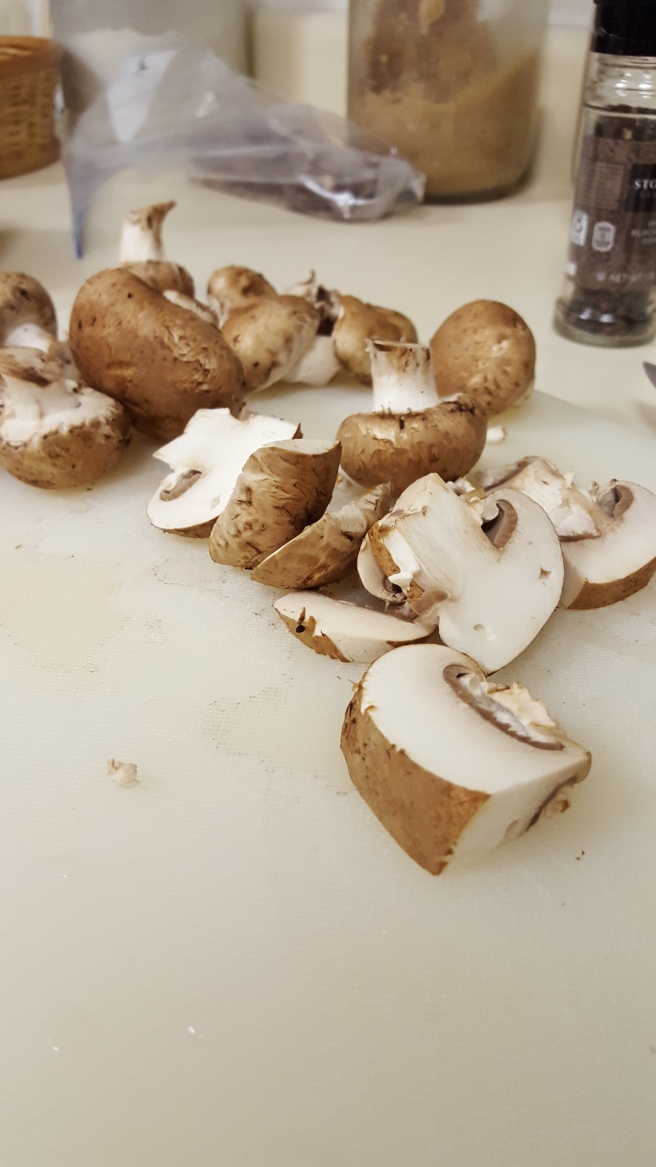
While the steak is resting is the opportune time to get your toppings ready. I’m a fan of sauteed mushrooms on my meat, but whatever tickles your fancy. Throw your little morsels into the still hot pan, with the butter and steak drippings. DEEE-lish.
I chose to serve this with a baked potato & salad with my homemade Ranch dressing. This one’s a winner, guys.
PS: If using a bone in steak, save the bones! We’ll make a beef stock soon enough and be in dire need of that delicious marrow.
Kitten Makes a Steak
Ingredients:
1/4 Cup Olive Oil
3 Cloves garlic, crushed or minced
1 Tablespoon dried Rosemary
2 Teaspoons dried Chives
Two cuts (your choice) of steak
2 Tablespoons Butter
Salt & Pepper to taste
Any toppings you like; I used mushrooms
Place olive oil, garlic, rosemary, chives, and meat into a resealable plastic baggie. Give the meat a good massage. Let sit for a good few hours, even overnight.
Take steak out to room temperature and allow to sit in marinade for about 10 minutes to rest.
Sprinkle steak with salt & pepper, to taste.
Heat pan on medium high. When pan is hot, add butter.
Allow butter to melt, and slightly brown, you want the pan very hot.
Place steak salt side down, and do not move for about 4 minutes. Flip steak when it’s halfway done. A good steak should only be flipped once.
Cook to desired done-ness.
Allow steak to rest before serving & eat that sucker up.
If using any toppings, throw them in the pan now while the steak is resting. They should be ready about the same time.